December 2008
Monthly Archive
December 27, 2008
Gimp gives us a number of tools for controlling the tone and colour of our images, but the undisputed kings are Levels and Curves. The vast majority of our photo editing needs will be catered for by either (or both) of these tools so they are quite important. This is just a primer to introduce some concepts, I’ll write a post showing Levels and Curves in action soon.
In order to use both Levels and Curves effectively you will need to understand the image Histogram, Sounds complicated at first but it’s actually quite simple. the image Histogram is a graphical representation of the tones in our image, from pure black on the left, to pure white on the right. The height of the graph represents that number of pixels within the image for each of the values in between.
So why is this information important to us?. Because it tells us quite a bit about our photo.
Exposure
if we see the majority of the graph clumped up on the left hand side it suggested that our photo is too dark (underexposed). If the majority of the graph is clumped on the right if suggests that our photo is too bright (overexposed).

In addition it can also tell us something else, if we see the graph spill off the right hand side it tells us that sections of our photo are “blown out” (pure white with no detail or texture), conversely if our graph is spilling off the left it tells us that our shadows have been “clipped” (pure black with no detail or texture).

Tonal Range
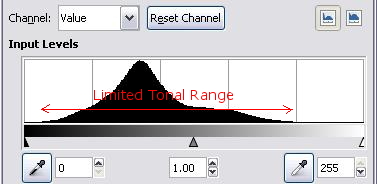
The image Histogram can also tell us about the tonal range of our photo. If we see that our graph is clumped up somewhere in the middle and not reaching to either (or both) end of the range, then our photo has a compressed or limited tonal range (our photo only contains a subset of the possible tones). The vast majority of scenes will contain both black and white so this usually suggests a problem. Look at the histogram of any photos you have which are hazy and lack contrast, limited tonal range is probably the problem.

Colour casts
There is more than one histogram or course, there is the Value histogram (Luminosity) which gives us basic brightness information. However there is also a seperate histogram for the Red, Green and Blue channels (we’ll skip the Alpha histogram for now). We know that pure white, pure black and neutral grey should contain equal amounts of red green and blue, so if one (or more) of the colour histograms looks significantly different from the others it may suggest a colour cast. Here is the Red, Green and Blue channels from an image with a strong blue colour cast.

Hopefully you now have some idea of the usefulness of Histograms, your digital camera may well have a histogram function which can be viewed during playback, if so consider turning it on and bring the power of histograms out into the field. Note however that many cameras only show the Luminosity histogram, this is of limited use, you really need the colour histograms if you plan to use the cameras histogram as a light meter, that said even just the luminosity histogram can be informative, especially on those sunny days when you cannot see the LCD screen on your camera well.
Tip: Don’t bite off more than you can chew, concentrate on the Value histogram until you are comfortable with it, it’s probably the one you’ll use most anyway.
T.
December 10, 2008


We are all familiar with the dreaded Red Eye in photographs. Fortunately most photo editing applications (GIMP included) have a Red Eye tool built in. Unfortunately most work by detecting red and working from there and hence fall flat on their collective faces when confronted with the green eyes which photos of dogs and other pets can be afflicted with.
This was exactly what happened to me today, anyway after some trial and error I came up with this method, it may not be perfect but it might be of some use in those situations where conventional Red Eye tools fail. Another option of course would be to select the offending colour and minimise it’s effect using the Channel Mixer tool, but I find this to be finicky process and I normally only end up changing the colour rather than elimenating it.
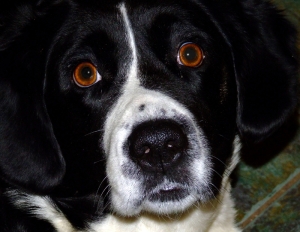
This photo of Lal was taken shortly before she died, she was a diabetic and the cataracts, which are a very common symptom of the disease, have caused a particularly nasty green eye effect. In this case I started by opening my file in GIMP and…
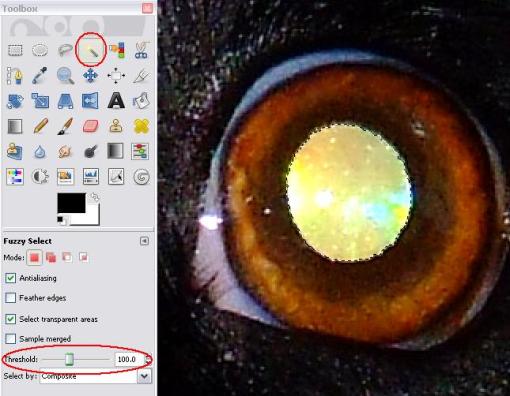
1. Zoom in on one of the eyes and select the Fuzzy Select Tool from the Toolbox and click on the eye. You will need to adjust the Threshold value until the entire green area is selected, In this example I increased the Threshold to 100. One thing I like about this method is that it does not matter if any catch lights are selected.

2. There is normally a small rim of colour just outside the area we selected. We can enlarge the selected area slightly by going to the dropdown menus and selecting Select > Grow… In the resulting dialog box choose to grow the selection by 1 pixel and click OK (you may need to use more in some cases)

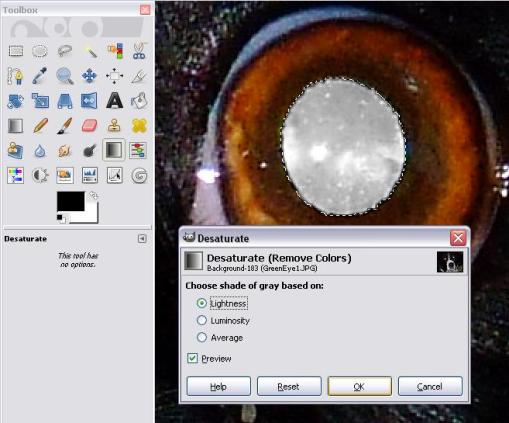
3. To get rid of colour select Colors > Desaturate… Choose a desaturation option and click OK. I have used the Lightness option in this case because it produced the darkest result.

4. Launch the Curves tool by selecting Colors > Curves… Then darken the selected area by using your mouse to grab the center of the curve and drag it down and to the right.

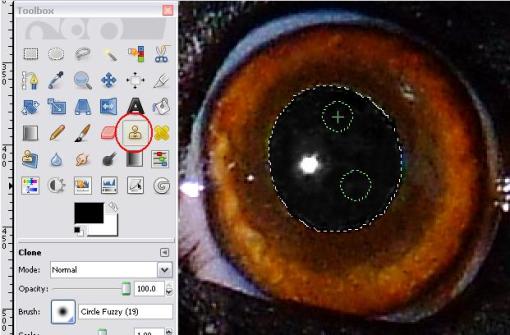
5. Use the Clone tool from the Toolbox to fix any odd reflections there may be in the eyes, in this case reflections from Lal’s cataracts. (This step will be unnecessary in the majority of cases).

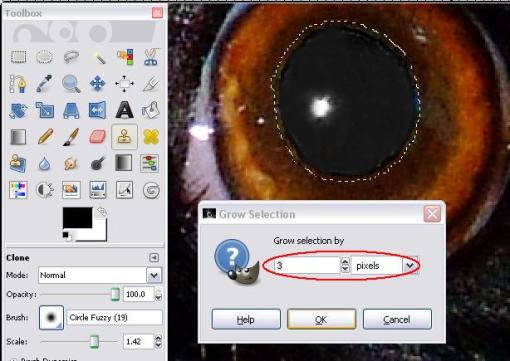
6. The transition between the selected area and the rest of the image will often be too “hard”, select Select > Grow… and this time enlarge the selection area by 3-5 pixels (or whatever suits your image) then select OK.

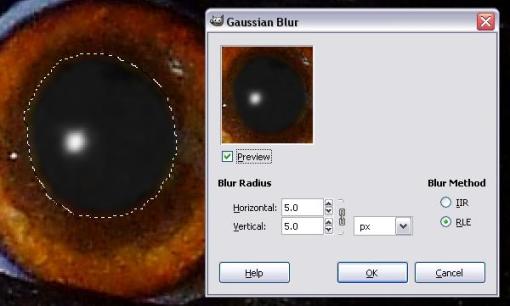
7. To do the actual softening use a gaussian blur. Select Filter > Blur > Gaussian Blur… I used the default of 5, then select OK.

8. Your eye should now be done, turn off the selection with Select > None and repeat the process for the other eye.
Happy GIMPin’
T.
December 5, 2008


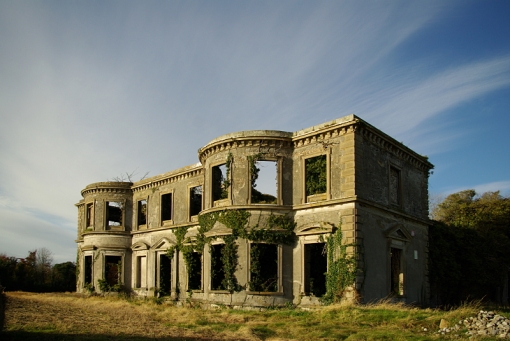
How many times have you taken a photo of a building (trees can to troublesome too) and found that the walls are sloping inward as they rise. This is called “converging verticals” or “keystoning” and is the result of tilting your camera upward to get the building in frame. You can avoid it by going further back and zooming in, as you will not have to tilt the camera upward.
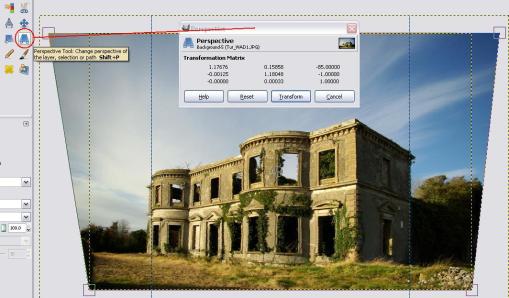
To correct it when it does occur is quite easy, I have selected a photo of a old ruin near where I live as it shows quite a pronounced example of this effect, unfortunately I could not go back any further due to my aversion to rusty barbed wire. To correct this, open your image and…
1. Move you mouse to the bottom of the left corner of the building, note the coordinate given at the bottom of the screen.

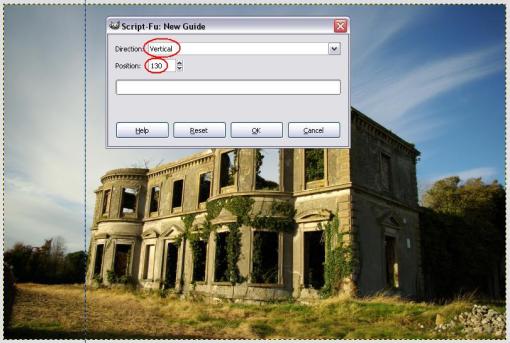
2. To add a guide line drop the dropdown menu select Image > Guides > New Guide. In the ‘Script-Fu New Guide’ dialog box select Vertical for the ‘Direction:’ and for the ‘Position:’ enter the coordinate you noted in step 1.

3. Repeat steps 1 & 2 to add a guide on the right hand side of the building. I added one at the back right corner because it was easier to see against the sky.
4. From the ‘Toolbox’ select the Perspective Tool and then mouse click in your image.
5. With your mouse, click and drag the top corners of your image outward. You may need to go back and forth between to two corners as moving one affects the other. When you are happy select Transform

6. Turn off the guide by selecting Image > Guides > Remove all Guides
7. Flatten your image by selecting Image > Flatten Image

Happy Gimpin’
T.


